How to use LAMBDA in Excel 365


In Excel 365, the lambda function is a powerful feature that allows you to create custom calculations on the fly. Here's a step-by-step guide on how to use lambda functions in Excel 365:


 1. Check Your Excel Version:

   Ensure that you are using Excel 365 or a later version, as lambda functions are a feature introduced in these versions.


 2. Understand Lambda Function Syntax:

   A lambda function in Excel 365 is defined using the `LAMBDA` function. The syntax is as follows:

   =LAMBDA(parameters, expression)

   - `parameters`: The input parameters for your function.

   - `expression`: The calculation or expression that defines your function.


 3. Create a Simple Lambda Function:

   Let's start with a basic example. Suppose you want a function to square a number. You can define a lambda function like this:

      =LAMBDA(x, x^2)

Note: This expression in the cell will give you an error “#CALC!”


   This lambda function takes one parameter (`x`) and returns the square of that parameter.


 4. Use the Lambda Function in a Formula:

   Once you've defined your lambda function, you can use it in any formula by calling it like any other Excel function. For example:

      =LAMBDA(x, x^2)(5)

   This formula calculates the square of 5 using the lambda function.


 5. Handle Multiple Parameters:

   Lambda functions can have multiple parameters. For instance, to create a function that adds two numbers:

      =LAMBDA(a, b, a + b)

Note: This expression in the cell will give you an error “#CALC!”


   Use it in a formula like:

      =LAMBDA(a, b, a + b)(3, 4)

      This formula returns the sum of 3 and 4.


 6. Create Complex Lambda Functions:

   Lambda functions can involve complex calculations. For example, a lambda function to calculate the area of a circle given its radius (`r`) could be:


   =LAMBDA(r, PI() * r^2)

Note: This expression in the cell will give you an error “#CALC!”


   Use it in a formula as:

      =LAMBDA(r, PI() * r^2)(2)

      This formula calculates the area of a circle with a radius of 2.


 7. Name and Manage Lambda Functions:

   You can name your lambda functions for better clarity. Use the `LET` function to assign a name to your lambda function and use it within your worksheet.


 8. Edit and Debug Lambda Functions:

   To edit or debug lambda functions, use the formula bar. Select the cell with the lambda function, and you'll see the function in the formula bar. Make changes as needed.


Unleashing the Power of the LET Function in Excel 365


Introduction

In the ever-evolving landscape of spreadsheet software, Microsoft Excel 365 continues to stand out as a powerhouse for data manipulation and analysis. One of the latest and most powerful additions to its arsenal of functions is the LET function. Introduced to Excel 365, the LET function enhances formula readability, simplifies complex calculations, and improves overall spreadsheet efficiency.

In this article, we will delve into the intricacies of the LET function, exploring its syntax, applications, and advantages.


Understanding the Syntax

The LET function in Excel 365 is designed to provide a more structured and readable way to define and name variables within a formula. Its syntax is straightforward, consisting of a series of variable assignments followed by the main expression. The basic structure of the LET function is as follows:


=LET(variable1, value1, variable2, value2, ..., main_expression)


Each variable is defined by a name (e.g., variable1, variable2) and its corresponding value (e.g., value1, value2). The main expression is the formula that utilizes these variables to produce the final result.

By breaking down complex formulas into named variables, the LET function simplifies the understanding and maintenance of formulas.


Improved Readability

One of the primary advantages of the LET function is its ability to enhance the readability of formulas. In traditional Excel formulas, complex calculations can result in lengthy and convoluted expressions. With LET, you can assign meaningful names to intermediate values, making the formula much easier to understand. Consider the following example:


=IF((A1+B1)*C1 > D1, (A1+B1)*C1 - D1, (A1+B1)*C1)

Now, let's rewrite the same formula using the LET function:

=LET(

    TotalAmount, (A1+B1)*C1,

    ExcessAmount, TotalAmount - D1,

    IF(TotalAmount > D1, ExcessAmount, TotalAmount))

In this example, the LET function allows us to break down the formula into named variables, providing a clear structure that significantly improves readability.


Dynamic Range Names

The LET function also facilitates the creation of dynamic range names within formulas. This is particularly useful when dealing with varying data ranges or when writing formulas that need to adapt to changes in the spreadsheet. By using LET, you can define range names dynamically, making your formulas more flexible and resistant to errors caused by changes in the dataset.


Consider the following scenario where you want to calculate the sum of values in a variable range:


=SUM(A2:A10)


Now, let's use the LET function to create a dynamic range name:


=LET(

    StartRow, 2,

    EndRow, 10,

    DynamicRange, OFFSET($A$1, StartRow, 0, EndRow - StartRow + 1),

    SUM(DynamicRange))


In this example, the LET function allows you to define the start and end rows dynamically, creating a range that adjusts to changes in the dataset.


Error Reduction and Debugging

The LET function can significantly contribute to error reduction and facilitate the debugging process. By breaking down complex formulas into smaller, named variables, it becomes easier to identify and rectify errors. If a particular part of the formula produces unexpected results, you can examine the individual variables to pinpoint the issue.


Moreover, since the LET function allows you to name variables, it reduces the likelihood of referencing errors. Named variables make it clear which values are used in the formula, minimizing the risk of inadvertent mistakes caused by incorrect cell references.

Performance Considerations

While the LET function enhances formula readability and maintainability, it's essential to consider its impact on performance. In general, the LET function does not introduce significant performance overhead. However, when working with extremely large datasets or complex formulas, it's advisable to test and evaluate the performance of your spreadsheet to ensure optimal responsiveness.


Conclusion

The LET function in Excel 365 is a valuable addition to the toolset of spreadsheet enthusiasts, offering improved readability, dynamic range naming, and enhanced error reduction. 

By allowing users to define and name variables within a formula, LET streamlines complex calculations and simplifies the debugging process. 

As you incorporate LET into your Excel workflows, remember to strike a balance between formula readability and performance considerations. 

With its versatility and power, the LET function empowers users to take their Excel skills to new heights, unlocking a world of possibilities for efficient data analysis and manipulation.

An Introduction to the Python Programming Language

What is Python?

Python is a high-level, interpreted programming language known for its simplicity and readability. Created by Guido van Rossum and first released in 1991, Python has become one of the most popular programming languages in the world. Its syntax is designed to be easy to understand and write, making it an excellent choice for beginners and experienced developers alike.


Why Learn Python?

Python's popularity is due to several key features:

Easy to Learn and Use: Python's syntax is straightforward, making it accessible for beginners.

Versatile: Python can be used for a wide range of applications, including web development, data analysis, artificial intelligence, scientific computing, and more.

Extensive Libraries and Frameworks: Python has a vast ecosystem of libraries and frameworks that simplify complex tasks.

Community Support: Python has a large, active community that contributes to its growth and provides support through forums, tutorials, and documentation.


Setting Up Python

Before you can start programming in Python, you need to set up your development environment. Here's a step-by-step guide to get you started:


Installing Python

Download Python: Go to the official Python website (https://www.python.org/) and download the latest version of Python. Python 3.x is recommended as Python 2.x is no longer supported.

Run the Installer: Run the downloaded installer. Make sure to check the box that says "Add Python to PATH" before clicking "Install Now".

Verify the Installation: Open a command prompt or terminal and type python --version. You should see the version of Python you installed.


Setting Up an Integrated Development Environment (IDE)

An Integrated Development Environment (IDE) is a software application that provides comprehensive facilities to programmers for software development. Here are some popular Python IDEs:


PyCharm: A powerful IDE for Python with many features, including code completion, debugging, and project management.

Visual Studio Code: A lightweight, customizable code editor with Python support.

Jupyter Notebook: An open-source web application that allows you to create and share documents containing live code, equations, visualizations, and narrative text.


Writing Your First Python Program

Once you have Python installed and an IDE set up, you're ready to write your first Python program.


Open Your IDE: Launch your preferred IDE.

Create a New File: Create a new Python file with a .py extension.


Write Code: Type the following code into your file:

print("Hello, World!")


Run Your Program: Save the file and run it. You should see the output:


Hello, World!

Congratulations! You've just written and executed your first Python program.


Understanding Python Syntax

Python syntax refers to the set of rules that defines how a Python program is written and interpreted. Here are some basic concepts:


Indentation

Python uses indentation to define blocks of code. Consistent indentation is crucial as it determines the structure of your code.


Code:

if True:

print("This is true")


Comments

Comments are used to explain code and are ignored by the interpreter. Single-line comments start with a #.

 Code:

# This is a comment

print("Hello, World!")


Variables

Variables are used to store data. Python is dynamically typed, meaning you don't need to declare the type of a variable.


Code:

x = 10

y = "Hello"

print(x)

print(y)


Data Types

Python supports various data types, including:

Numbers: int, float, complex

Strings: str

Lists: list

Tuples: tuple

Dictionaries: dict


Code:

a = 5         # int

b = 3.14      # float

c = "Python"  # str

d = [1, 2, 3] # list

e = (4, 5, 6) # tuple

f = {"name": "Ram", "age": 30} # dict


Basic Operations

1.5.1 Arithmetic Operations

Python supports basic arithmetic operations:


Code:

a = 10

b = 5

print(a + b)  # Addition

print(a - b)  # Subtraction

print(a * b)  # Multiplication

print(a / b)  # Division

print(a % b)  # Modulus

print(a ** b) # Exponentiation


String Operations

You can perform various operations on strings:


Code:

str1 = "Hello"

str2 = "World"

print(str1 + " " + str2) # Concatenation

print(str1 * 3)          # Repetition

print(len(str1))         # Length


Final Remarks.

In this chapter, you've been introduced to Python programming. You learned about Python's history and features, how to set up your development environment, and wrote your first Python program. You also explored Python syntax and basic operations. In the next chapter, we will dive deeper into Python's data structures and control flow mechanisms. Happy coding!


How to disable Touchscreen in Window 10

 Hello guys, who are using window 10, sometimes they do not want to use touch screen feature.

So how can you disable the touch screen.

Let’s check it out.

Type, in search box (click on window icon and type), “Device manager”, best match will be in front of you, just click on it, device manager window will open.


Click on “Human Interface Devices”, list of all devices will be displayed.


Scroll down and select “HID-compliant touch screen”.

Take the cursor over the down arrow, “Disable device” will appear.  Click on this arrow.


A warning window will appear saying, “Disabling this device will cause it to stop functioning. Do you really want to disable it?”

Click on “Yes”, and you have done it.

Now check the screen, use your hand to scroll the screen, it should not sense the touch.


How easy it is, no?


How to get Excel File name?


Hi Learners, in this blog post I will share how you can get the Excel File name.

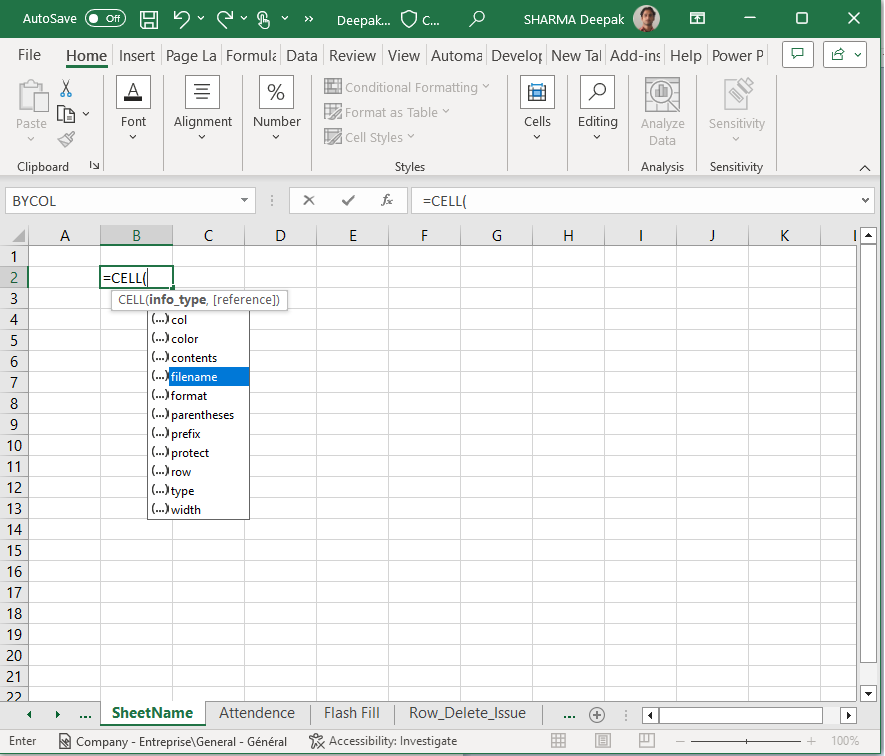
Select a cell.


Type “=CELL” & press TAB, select option “filename” & press TAB, close the bracket, press ENTER.


This will give you the whole address of the Sheet, including the file name, folder name etc.

But we need to take only the File name.

So, for this purpose I will use MID, FIND Functions along with CELL.

Refer to the below formula.

=MID(CELL("filename"),FIND("[",CELL("filename"))+1,FIND(".",CELL("filename"))-FIND("[",CELL("filename"))-1)


How to get Excel Sheet Name


Hi Learners, in this blog post I will share how you can get the Excel sheet name.

Select a cell.


Type “=CELL” & press TAB, select option “filename” & press TAB, close the bracket, press ENTER.


This will give you the whole address of the Sheet, including the file name, folder name etc.


But we need to take only the Sheet name.

So, for this purpose I will use MID, FIND Functions along with CELL.

Refer to the below formula.

=MID(CELL("filename"),FIND("]",CELL(("filename")))+1,30) [Max. Length of Sheet name = 30 Char]


Change the “SheetName” to “SheetName_1”. It should read the new sheet name.


How to use Flash fill in MS Excel?


How to use Flash fill?

Hello friends, in this blog I will teach you how you can use Flash fill option in MS Excel.

Friend it is a magical option/tool.

It follows the pattern and takes action as per this pattern.

In below example, I have a column having complete name; first and last name in single cell.

I want to set First name and Last name in separate cells.

In Column C ( First Name) I write the first name; Suresh and hit the enter button.

Now go to ‘Data >> Flash Fill’ & click over there or just press ‘Ctrl + E’ and it will put the First names in the respective Rows.


Now type Last Name in column D, ‘Sharma’ and press enter.

Press ‘Ctrl + E’ and like before all last names will be set in column D in respective Rows.


MS Excel Logical Functions

Logical functions in Excel are powerful tools that help you make decisions based on conditions. Whether you're comparing values or testi...

Post Count

Loading...